
Q: How do I build a launcher?
A: A useful and versatile launcher can be built from inexpensive parts purchased at your local plumbing or hardware store. The design shown here is inspired by one invented by Paul Grosse. This design is unique in that it eliminates the tube in the throat of the rocket bottle. Eliminating the tube allows experimentation with different inserts that can be used to reduce the nozzle diameter or add a twist for spin stabilization of the rocket.
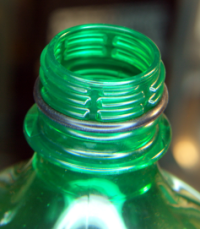 This launcher seals to the rocket motor on the outside
of the bottle using an o-ring. Just by luck, a 1"-to-1/2" pipe
reducer has an inside diameter that just clears the outside diameter of the threads
on the bottle neck. A #119 (15/16" ID x 1-1/8" OD) O-ring fitted to the bottle
forms a nice seal with the 1" end of the reducer.
This launcher seals to the rocket motor on the outside
of the bottle using an o-ring. Just by luck, a 1"-to-1/2" pipe
reducer has an inside diameter that just clears the outside diameter of the threads
on the bottle neck. A #119 (15/16" ID x 1-1/8" OD) O-ring fitted to the bottle
forms a nice seal with the 1" end of the reducer.
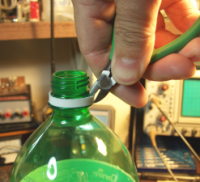 Before installing the o-ring on the bottle you must first remove
the plastic ring left from the bottle cap. Small nippers are best,
or a sharp knife. Be careful not to scratch
the surface of the bottle where the o-ring will rest. It is important to note here that the condition of the bottle effects how much pressure
it can safely hold. Use only bottles that are in good shape, without scratches or nicks, especially when loading to higher pressures.
Before installing the o-ring on the bottle you must first remove
the plastic ring left from the bottle cap. Small nippers are best,
or a sharp knife. Be careful not to scratch
the surface of the bottle where the o-ring will rest. It is important to note here that the condition of the bottle effects how much pressure
it can safely hold. Use only bottles that are in good shape, without scratches or nicks, especially when loading to higher pressures.
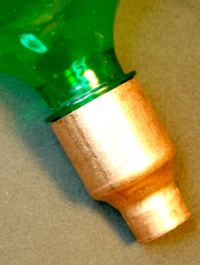
 To make
mating the bottle to the reducer easier, cut a small bevel on the
inside edge with an X-Acto knife. Once you have the o-ring on the
bottle add some petrolium jelly to make it easier to mate and less
damaging to the o-ring.
You can now fit the bottle and reducer together. It may take a bit of
force to mate them.
To make
mating the bottle to the reducer easier, cut a small bevel on the
inside edge with an X-Acto knife. Once you have the o-ring on the
bottle add some petrolium jelly to make it easier to mate and less
damaging to the o-ring.
You can now fit the bottle and reducer together. It may take a bit of
force to mate them.
 Of course,
to take advantage of this lucky fit requires using copper fittings for
the launcher. "Sweat soldering" is required to assemble
copper fittings. I use a small shop torch that burns propane, paste
flux, and solder, all purchased at the plumbing store to solder the pieces together. It may take some
practice to make good solder joints, but the resulting launcher will be
more versatile. And, if you ever need to work on your plumbing you'll be prepared!
Of course,
to take advantage of this lucky fit requires using copper fittings for
the launcher. "Sweat soldering" is required to assemble
copper fittings. I use a small shop torch that burns propane, paste
flux, and solder, all purchased at the plumbing store to solder the pieces together. It may take some
practice to make good solder joints, but the resulting launcher will be
more versatile. And, if you ever need to work on your plumbing you'll be prepared!
Some Pipe Soldering Pointers:
- Clean the copper parts with a wire brush or sandpaper before assembly.
- Apply flux paste to the clean parts where they mate.
- Assemble all the parts before soldering to make sure everything fits.
- Use a vise or clamp to hold the parts while you solder them. They will get quite hot, holding them by hand is not advised.
- Heat the fittings, not the solder, then apply the solder between the parts until it flows.
- Add enough solder to fill the gap between the parts. Some will drip out of the joint when it is full. You can carefully wipe the excess away with a shop cloth, while it is hot, for nicer appearance.
- Do not move the assembly while it is hot, this will cause the solder joints to be weakened. Once the solder is cool then you may handle the assembly.
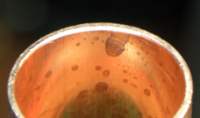
When soldering the 1"-to-1/2" reducer to the 1/2" pipe be careful to keep solder out of the 1" end where the o-ring will seat. Any solder in this area will cause leaks or excessive wear on the o-rings during launch.
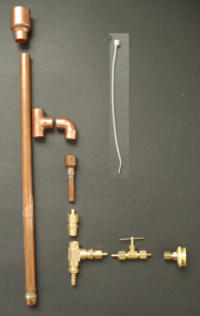 Some
additional fittings are required to connect the water source and air to
the rocket. Compression and threaded pipe fittings are used. These
are assembled using wrenches. Always cover
the threaded pipe fittings with nylon tape before threading them together, then
tighten them very snugly. Connect the tubes and fitting after you have
assembled the other soldered pipe connections. Leaks will be obvious the first time you presurize your new launcher. Final
tightening of the fittings can be done, while under pressure, to close leaks.
Some
additional fittings are required to connect the water source and air to
the rocket. Compression and threaded pipe fittings are used. These
are assembled using wrenches. Always cover
the threaded pipe fittings with nylon tape before threading them together, then
tighten them very snugly. Connect the tubes and fitting after you have
assembled the other soldered pipe connections. Leaks will be obvious the first time you presurize your new launcher. Final
tightening of the fittings can be done, while under pressure, to close leaks.
A 6mm plastic Airsoft BB is used to make a check-valve between the launcher and the bicycle pump. Place the BB in the 1/4" Pipe T before threading the last fitting into it. The BB should block the flow of water out of the hose barb fitting, but allow air to come into the launcher from the bicycle pump. You can check this by blowing into the unit after assembly.
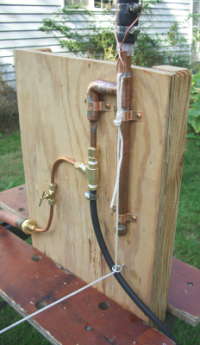
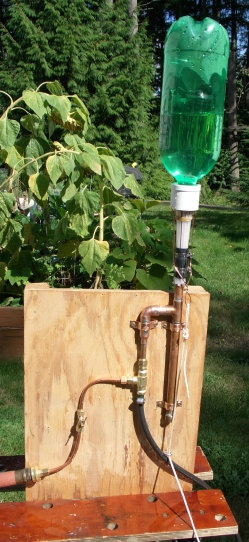 The completed launcher can be mounted on plywood for strength. I use my
"Shop Mate" folding workbench to hold the launcher assembly a
comfortable height above the ground where it is easiest to work.
Note the water source, connected through the inline valve, is used to fill the
rocket after it has been mated to the launcher. Once the rocket
has been filled to the desired load fraction, a bicycle pump or compressor connected to the hose barb adds
the desired air pressure. This feature allows rapid loading and launching
of rockets during classes or contests.
The completed launcher can be mounted on plywood for strength. I use my
"Shop Mate" folding workbench to hold the launcher assembly a
comfortable height above the ground where it is easiest to work.
Note the water source, connected through the inline valve, is used to fill the
rocket after it has been mated to the launcher. Once the rocket
has been filled to the desired load fraction, a bicycle pump or compressor connected to the hose barb adds
the desired air pressure. This feature allows rapid loading and launching
of rockets during classes or contests.
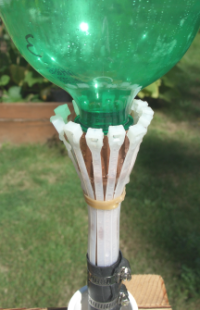
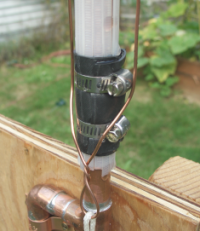 The rocket is held down during pressurization, and released at launch, by 12 plastic cable ties. This method was invented by
Ian Clark.The
cable ties are attached to the copper
tube by 1" hose clamps. Two rubber sheets, cut from an old bike inner tube,
are wrapped around the pipe and over the ties keep them from moving
against the copper tube. It's a little tricky getting these assembled,
but using temporary fasteners like rubber bands, string, or a smaller
cable tie can help hold things in place intil the
clamps can be tightened.
The rocket is held down during pressurization, and released at launch, by 12 plastic cable ties. This method was invented by
Ian Clark.The
cable ties are attached to the copper
tube by 1" hose clamps. Two rubber sheets, cut from an old bike inner tube,
are wrapped around the pipe and over the ties keep them from moving
against the copper tube. It's a little tricky getting these assembled,
but using temporary fasteners like rubber bands, string, or a smaller
cable tie can help hold things in place intil the
clamps can be tightened.
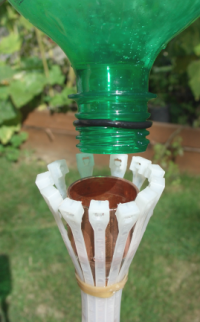
| Operating the launcher is simple. Each rocket must have the o-ring install just beyond the thread on the bottle neck. |
|
| Mate the rocket into the reducer. |
|
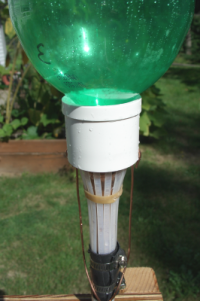
| Slide the PVC ring up to a stop around the cable ties and the rocket bottle neck. Add water to the desired load fraction, then pump air to the desired pressure. Now you are ready to launch. |
|
| The 1/8" nylong cord here provides a remote release. A gentle pull on the cord pulls the ring down, releasing the cable ties, and the rocket pops off! |
|
Parts List:
for more information see:
Paul Grosse's copper-tube cable-tie launcher

Question? Comment? Send A Message

216.73.216.175
