
Q: How do I make and attach a parachute to the rocket?
A: A 10-20 inch diameter parachute made from a plastic garbage bag works well for a 2-liter plastic bottle rocket weighing about 1/4 pound (4 ounces). I'll present instructions for manufacturing the parachute below, but first lets talk about some design decisions you need to make.
There are a few factors you may want to consider before designing your parachute:
These factors are important to your design because they effect how fast you'll want the rocket to descend under parachute, and how far down-range it will go before returning to the ground. For most of us there is limited space for our recovery area (the park, or your backyard).
An example:
Your rocket is going to go 200 ft in the air (by simulator estimate), it weighs 3.8 onces, and the wind is blowing at 6 miles per hour.
If you have a 30 inch parachute on your rocket it will descend at 2.3 feet per second. The wind is 8.8 feet per second. Your rocket will travel 765 feet down-range before landing.
Do you have a field 800 feet wide?
If you reduce the size of the parachute to 8 inches it will descend at 8.8 feet per second. Then the rocket will land 200 feet down-range from apogee.
So, how do I calculate the right size?
The behavior of a circular parachute is governed by the drag it produces when pulled through the air. The resistance force due to drag is:
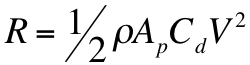
Where:
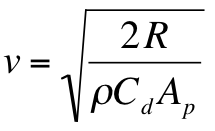
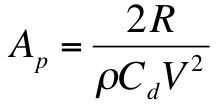
Using a little algebra we can rearrange this into other forms:
To calculate Velocity for a given weight(R) and diameter:
Now build the parachute:
You'll need:
Step-by-step:
- Cut two seams of the plastic garbage bag to open it into a sheet.
- Cut a square of the plastic large enough on each side to include your parachute diameter.
- Fold the plastic square in half.
- Fold the plastic again to form a 1/4 square.
- One corner of the square is the center of your plastic sheet.
All subsequent folds should be at this corner, forming a wedge.
Fold the plastic 3 more times, each time dividing the angle in half.
This should form a wedge of about 11-12 degrees.
NOTE: Try and make these folds as sharp as you can. These folds will be visible later to guide the attachment of your shroud lines.
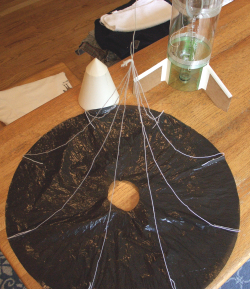
- Measure the parachute radius from the point of the wedge and cut the folded plastic to form the circular outline of the parachute canopy.
- Unfold the plastic onto a flat surface (usually the kitchen table).
- Attach 8 shroud lines as follows:
- Tie a knot ~1 inch from the end of the kite string.
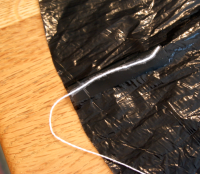
- Use 2 inches of invisible tape to attach the knotted end of the string to the plastic at 45 degree intervals around the edge. Use the fold lines, still visible in the plastic, to guide placement of the string. Press the tape firmly onto the plastic.
- Cut the shroud line length to match the diameter of the canopy.
- Gather together the ends of all 8 shroud lines. Tie an over-hand knot about 3/4 inch from the end.
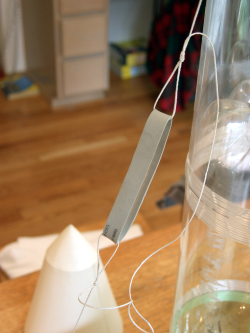
- Tie a slip-knot on one end of the heavier nylon string or cord. Tighten this knot over the knotted end of the shroud lines.
- The parachute is now completed. Test the parachute with a dummy weight tied to the cord. Fold the parachute and throw it into the air (outside!).
- Tie the rubber band in the middle of the cord to form a shock absorber using two loops about 8-10 inches apart.
- Attach the free end of the cord to your rocket with strapping tape, either at the center of gravity for heavier rockets or the top of the rocket body under the nose cone.
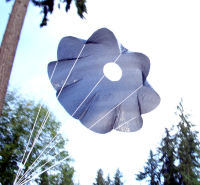
NOTE: you may also cut off 1-1.5 inches of the point to form a 2-3 inch hole in the center of the parachute canopy. A hole in the center stabilizes a parachute so that it descends without wandering.
for more information see:

Question? Comment? Send A Message

216.73.216.175
